I often have trouble producing an art work for a ‘themed ‘challenge. I overthink it and I find that my best work or, at least the work I am happiest with, comes from the heart. Would I like that quilt on my wall day in and day out, is the question I ask. If it doesn’t fill me with joy, then invariably it doesn’t get finished! The theme for this challenge had been percolating in my head for a long time and it took an age before a clear idea formed. It nearly didn’t happen….. I was pretty involved in the preparations for my daughter’s wedding in early December and I knew that if I had it clear in my head by the time the wedding was over, then I should be able to get it finished!
People often comment that I produce work quite quickly, but it usually has been made in my head for several months before I actually begin work. Naturally, changes occur along the way but they are usually due to technical or construction issues that I encounter. It is unusual for me to take photos as I go, (I forget!) but I happened to use the camera a lot in the production of this piece as I needed to step back from it to see what I was actually making!
The beginning….I started with the thread embroidery. I have never ever tried this before, but I had watched a video – so …. how hard could it be? I sketched my ‘elder’ straight onto the water soluble plastic – I used a double layer of the ‘plastic’, then I hooped it, dropped my feed dogs and away I went.
I soon realised that it was pretty hard to see what I was doing and thus get a perspective on the image being made. I started on the shoulder and the lower half of the body first mainly because I was a bit scared to do the face. Five colours of thread were used- black, two shades of grey, white and a little bit of brown in the hair and beard.
Taking photos helped – you can from the photos below that the moustache was wrong. This was much more noticeable in the photograph than when just looking at it. More stitching and more photos until I was happy.
You can also see that I have trimmed the plastic around the edge to get rid of the bulk before I soaked the finished piece in water to dissolve the plastic. Magically it all stayed together!
Next was the decision on which background fabric to use. I auditioned two fabrics and both created a different vibe and I wasn’t sure which I preferred, so I keep both in the running. I sketched some of my songline ‘circles’, more to get an idea of the size than anything else and pinned them on both the fabrics.
Steam- a-seam was ironed onto the back of my chosen fabrics. Circles were cut and then placed onto black fabric. – Each yielded two circles and on some I cut the black off the outside edge.

The coloured circles were stitched down except for the outside edge – This would be stitched when placed on the background. I then painted the dots using tsukineko inks. I made enough circles to be able to play with layout on the two backgrounds so I could compare and make a decision. This decision was aided by my siblings – I trust them for honest opinions and when in doubt I send them a photo with a question eg ‘which background’ and they reply and often I listen! The interconnected lines were initially cut from fabric that I found in my stash. I also made thread lines in ochre thread and also my ‘campfire’ symbols were thread embroidered (same method as I used for the elder) and I then played with the layout.
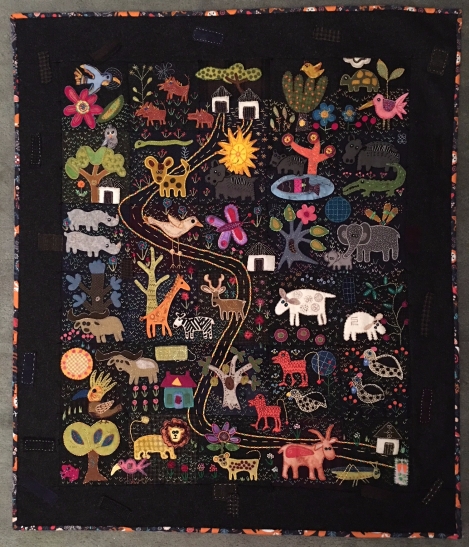
While this seemingly mechanical placement was happening, there was actually a method in my madness. The ochre threads are the dominant links between the orange circles. These orange circles are key points in my family story and in particular my daughter’s life. Kiriana has been teaching in remote Cape York for just over five years and the energy, the joy, the struggles and the children of the Cape have not only embedded themselves in her life but in the lives of all our family. Her fellow teachers are an absolute inspiration and I admire their dedication and sheer love of the land and the community. As with all songlines, a lot is hidden or is private to the outside viewer, but the symbols and the links all are symbolic in the telling of our story.
Once I was happy with the placement, it was time to quilt. I have taken a photo of my practice piece where you can see a couple of patterns that I played with but most of the decisions actually centred around the colour of the thread.

Once I had made those decisions, l quilted the piece through two layers, the top and the batting. I then pieced a background using the green fabric that I had auditioned for the front and used several of the circles to give interest. (I had lots!) I stitched around the outside of the coloured circles through the three layers to tie it all together. The thread embroidery was tacked onto some soft black wadding and was then hand-stitched to the background piece as well as through some of the contours to give depth. The facing binding method was used so I could keep the edges straight and also because I didn’t want to subject my thread embroidery to excessive manoeuvring. I then four plaited the headbands with raffia and hand-stitched them onto the finished quilt. Voila! it was finished and even a week early!!!